
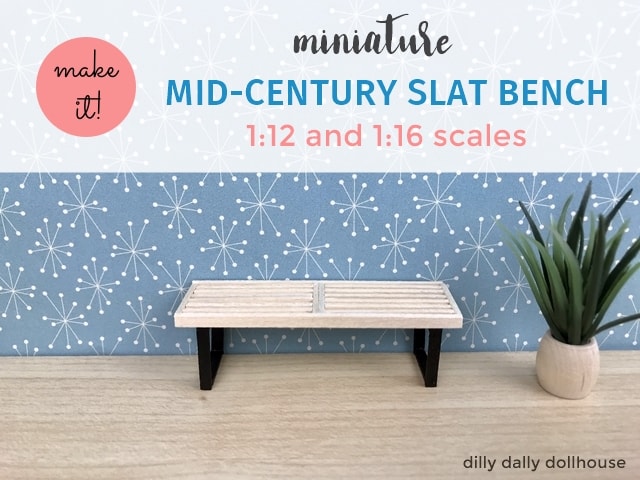
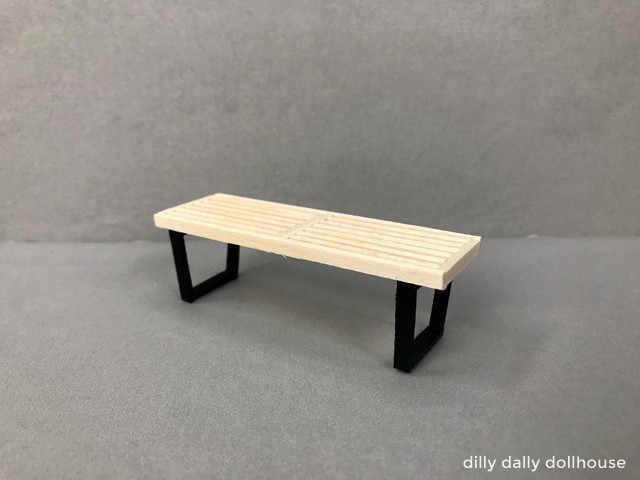
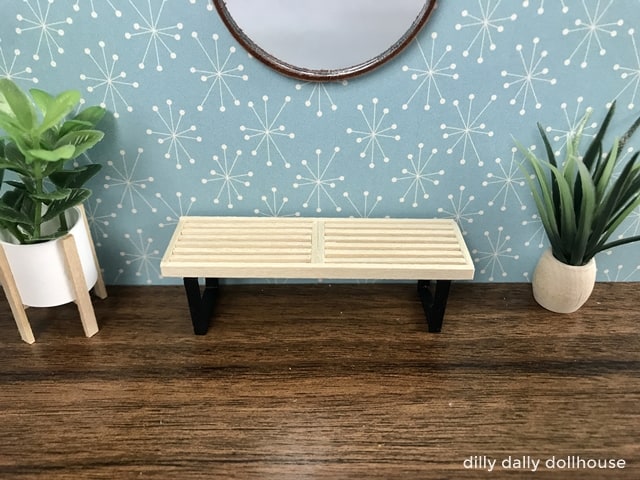
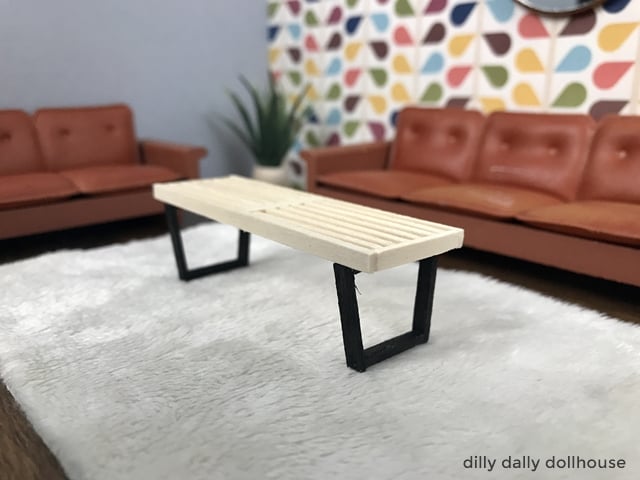
This miniature slat bench (or coffee table) is based on George Nelson’s mid-century design. It’s a relatively easy project, though it does require exact measurements. While a machine like Cricut makes accurate cutting a breeze, you can still get even, consistent cuts with just a craft knife and a grid ruler (I’ll show you how, below!)
Tools and Materials to make Miniature Slat Bench
Pretty much all of the pieces that make up this bench is 1/8″ wide basswood strips at 1/16″ thickness, cut at different lengths. I use 1/16″ basswood sheet here, cut with Cricut Maker, which is the most effortless way to get accurate cutting.
- 1/16″ basswood sheet
- Cricut Maker + purple StrongGrip mat + knife blade
- or a good, sharp craft knife (my go-to is X-acto light-duty utility knife)
- Grid ruler (optional for manual cutting)
- Varnish or stain
- Black paint (I use one with satin finish)
- Wood glue
- Craft tweezers (for inserting the slats)
Continue reading on why I don’t recommend using 1/8″ by 1/16″ basswood strips.

Tips/Instructions for Manual Cutting
You may wonder we why don’t just get 1/8″ x 1/16″ basswood sticks and cut them to length? We certainly can, but I don’t recommend this, and here’s why.
It’s important to get the lengths of the slats the same, to make sure they will fit nicely within the frame. As we humans are imperfect, the more measuring and cutting we have to make, the more inconsistencies will occur.
I recommend getting a sheet of 1/16″ basswood, and cut the pieces using the following instructions. (Here I use 4-ply matboard, which is also 1/16″ thick, to illustrate the steps)
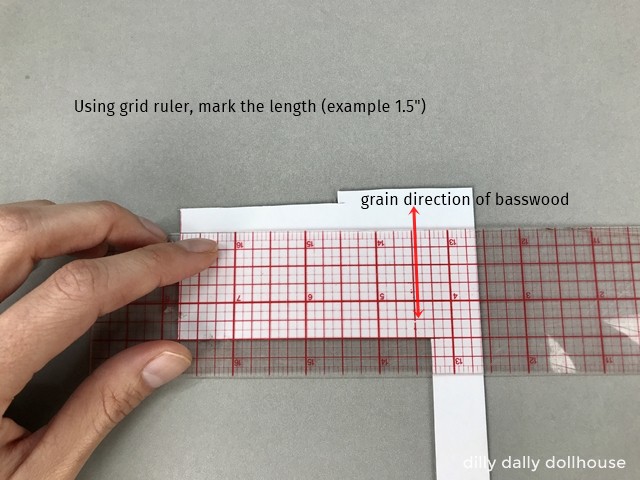
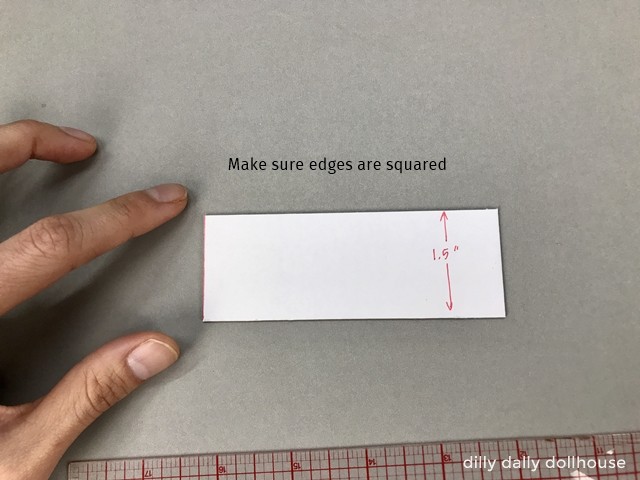
Step 1: Measure the length
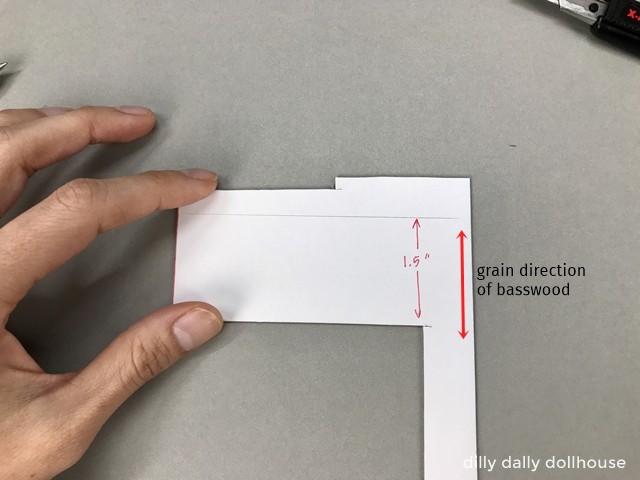
In this example I’m making pretend slats that measure at 1.5 inches long. With basswood, orient the grain so that the length is along the grain. In this picture, the grain direction is the same as the measurement arrow.
Step 2: Cut the length
Now you have a rectangle at 1.5″. Make sure the corners are square. I left the perpendicular side uncut.
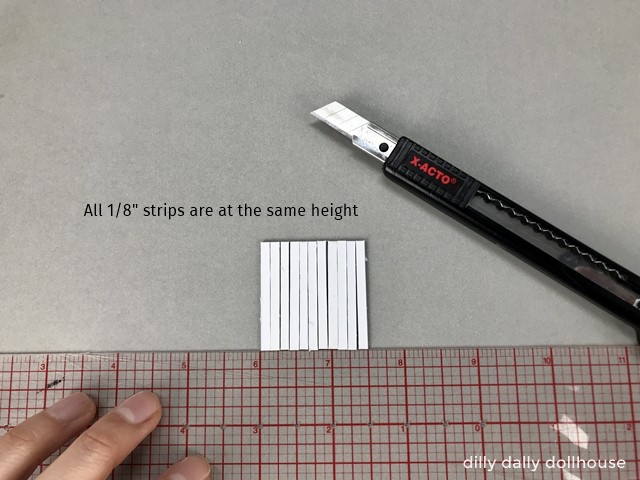
Step 3: Cut at 1/8″ widths
Use a transparent grid ruler with 1/8″ markers to do this. Align the ruler at 1/8″ marker,
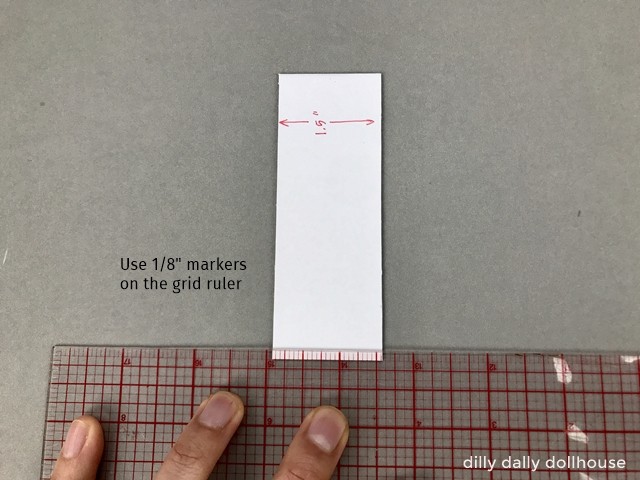
Score first, to make sure it’s straight. Scoring/cutting on basswood should be easy as it’s along the grain.

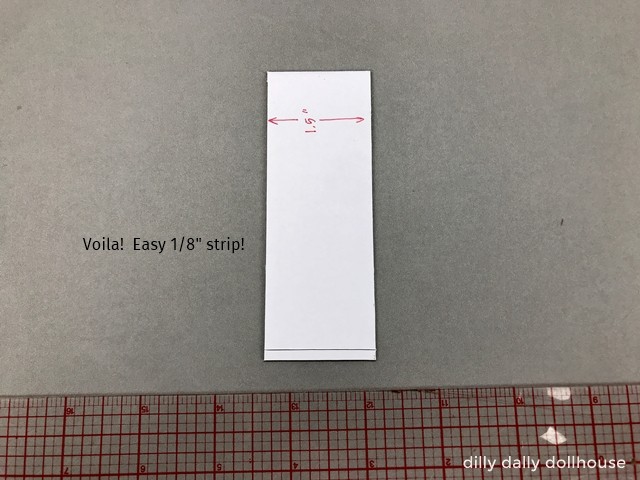
You can cut completely or continue scoring the next 1/8″.
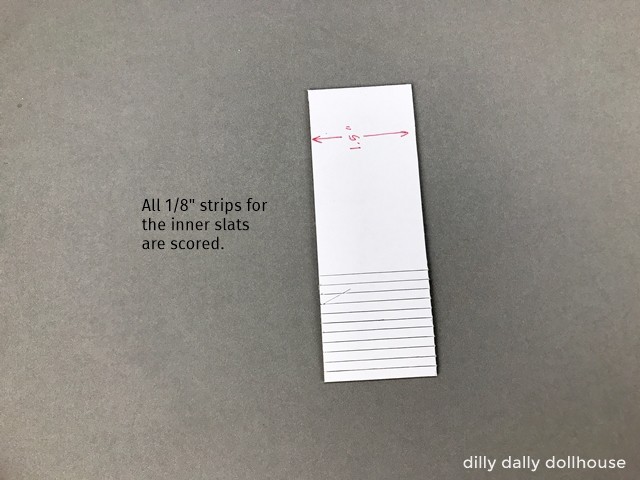
Here I scored multiple 1/8″ strips to make the required number of slats. You see there’s an errand cut on a few of them, but it’s easily hide-able (or you can cut a few extra, for back up).
Voila! Now we have 1/8″ strips all at the same length. By measuring and cutting each length only once, we minimize the chance of inconsistencies.
Measurements for Miniature Slat Bench
You can download the SVG files from the library, if you plan to cut using Cricut Maker (or other die-cut machines that can cut wood. The library is a bonus offer to my subscribers (and it’s free to subscribe!).
Check out this quick video tutorial on importing and resizing the SVG file into Design Space.
1:16 scale
You can download the printable measurement guide for 1:16, or cut the 1/16″ basswood sheet as follows:
- 2 pieces of 1/8″ x 3″ for outer slats/frame
- 12 pieces of 1/8″ x 1-3/8″ for inner slats
- 10 pieces of 1/8″ x 13/16″ for cross slats (4), top of legs (2), vertical part of legs (4)
- 2 pieces of 1/8″ x 5/8″ for bottom of legs
Be sure to review and follow the above tips/instructions for manual cutting!
1:12 scale
You can download the printable measurement guide for 1:12, or cut the 1/16″ basswood sheet as follows:
- 2 pieces of 1/8″ x 4″ for outer slats/frame
- 16 pieces of 1/8″ x 1-7/8″ for inner slats
- 10 pieces of 1/8″ x 1-1/8″ for cross slats (4), top of legs (2), vertical part of legs (4)
- 2 pieces of 1/8″ x 15/16″ for bottom of legs
Be sure to review and follow the above tips/instructions for manual cutting!
Assembly Instructions
Step 0: aka NOTES!
Keep in mind that the 1/16″ side of the slats will be facing the top/bottom of the bench, while the 1/8″ side faces front/back.
If you’d like to stain and/or varnish the slats, do it now before assembly, to ensure uniform color. I varnished mine to slightly darken the wood and add a bit of sheen.
The legs will be painted black. You can do so before or after assembling the legs, but definitely before attaching the legs to the bench top (step 5).
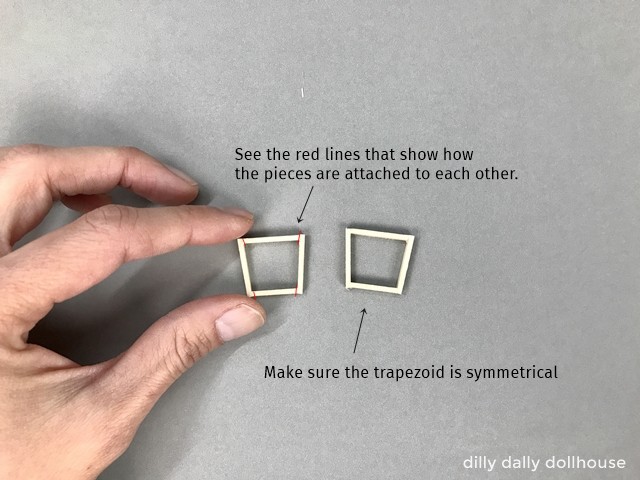
Step 1: Assemble the legs
Apply a tiny bit of glue on the the ends of the top and bottom part of legs, and attach them to the vertical part of legs. The legs will form a trapezoid shape. Do your best to make them symmetrical (not skewed to either side). When you’re happy with the symmetry, set them aside as the glue dry. (You will want to paint them black after the glue dries).
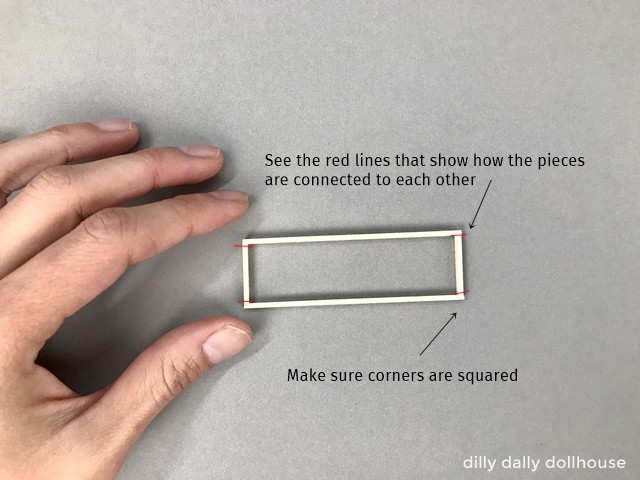
Step 2: Make the outer frame of the bench
Apply a tiny bit of glue to the ends of two cross slats. Attach the cross slats to the two longest slats to form a rectangle. Make sure the corners are square.
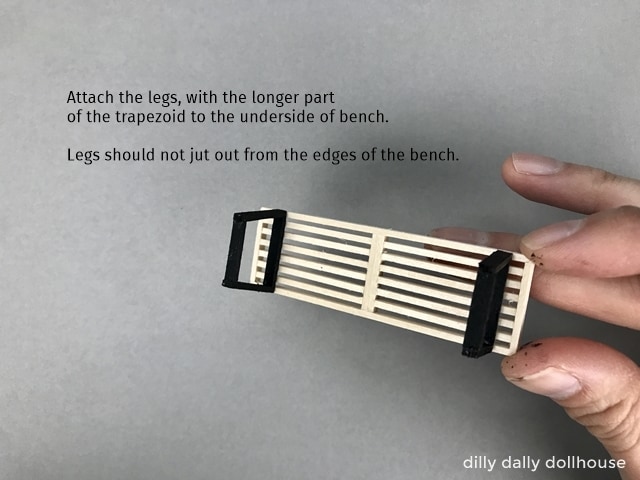
Note: At this time, you can dry fit the legs against this frame. The legs should be the same width as the frame or slightly narrower. You definitely don’t want the legs to jut out from under the bench frame.
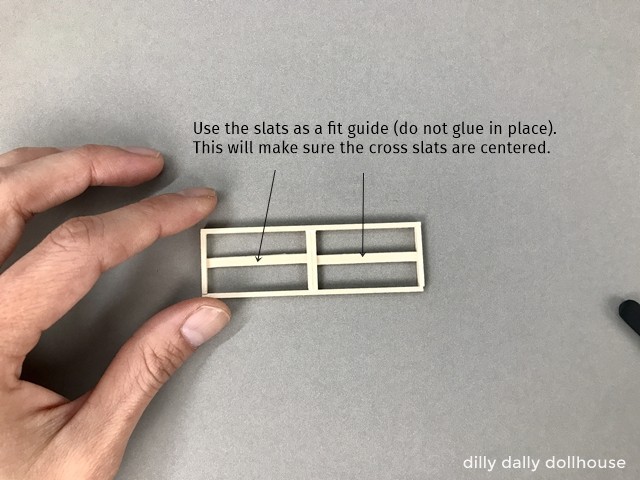
Step 3: Insert the middle cross slats
Apply a tiny bit of glue to the ends of two cross slats. Insert the cross slats side by side, into the middle of the frame. Here I used the slats as a guide to find the exact middle. Make sure the corners are square.
Step 4: Insert the slats
Apply a tiny bit of glue to the ends of each slat, and insert them one by one carefully into the frame, at 1/16″ apart. Do your best to align them straight. I recommend using craft tweezers to do this, as our fingers tend to accidentally move things too much.
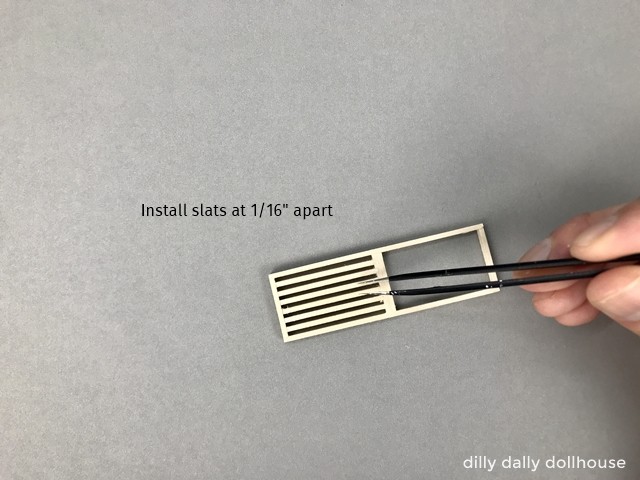
Repeat for the other side, aligning the slats to the installed side.
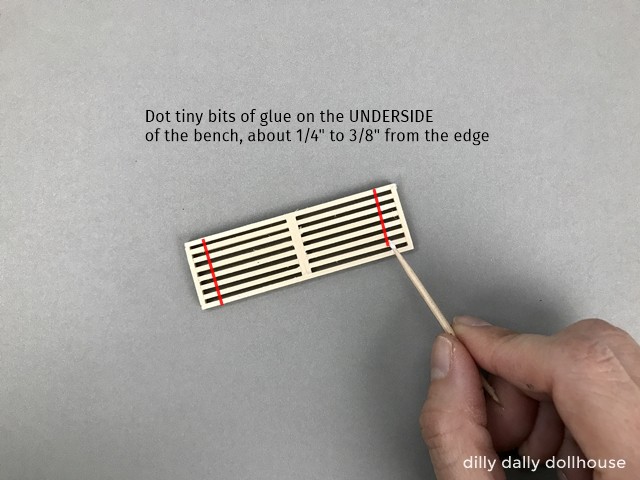
Step 5: Attach the legs
If you haven’t done so, paint the legs black and let it dry.
Apply tiny dots of glue on the underside of the bench top, about 1/4″ from the short edge. Then attach the wider side of the leg. Do the same for the other side, making sure it’s the same distance from the edge.
Complete!
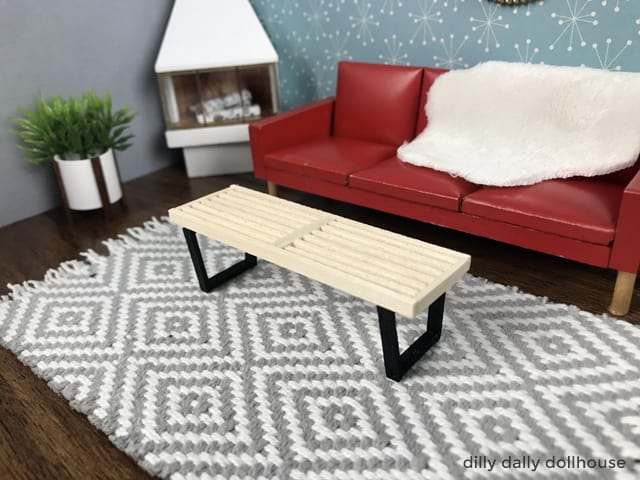
And some obligatory in-scene pictures of the miniature slat bench/coffee table for your entertainment….
Be sure to check out the miniature wood case sofa that goes great with this miniature bench!
RELATED PROJECTS
Made your own? I’d love to know!
What motivates me the most is seeing you use my tutorials to make your own minis! There are many ways you can share your projects:
- comment below to let me know (or if you have any questions about it–for the benefit of others also!)
- link back to my site or this tutorial,
- tag me on Facebook or Instagram,
- share your version on my Facebook group!
Thanks so much for the tutorial! I agree with the tip that cutting the slats individually it’s basically impossible to get them to the exact length! This is my first successful dollhouse furniture build, appreciate your help!
I went to the library to download the SVG file but it wasn’t there. I’m so glad someone is making dollhouse SVGs for the Maker!
Marilyn
Thanks Marilyn! I just checked in the resource library (the one after you enter the password), the SVG files for both 1:16 and 1:12 slat bench are there, under the SVG section. Or you can do Ctrl+F (the “find” command) and type in “slat bench” to find it.
Congratulations on the American Miniaturist’s article and thank you for sharing the tutorial.
Thanks, Carrie! 💕
Do I dare admit that we had a similar table when I was a teenager? You have done a beautiful job making your table and such clear instructions for the rest of us.
Thanks, Sherrill! And how lucky you are to have had such cool table in 1:1!